My First Cat

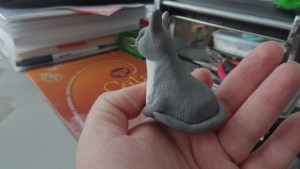
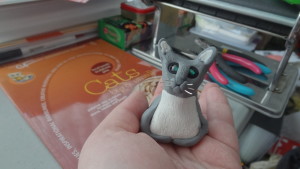
Summer has finally arrived and I am excited. A gray cat with a white stomach, green bead eyes, and wire whiskers eyes me curiously from my palm. Since classes are done, I have time to practice my polymer clay techniques.  I’ll be traveling a lot over the next few months so in the beginning of June I have to say goodbye to my polymer clay oven and leave most of my craft supplies behind.  Therefore I plan to make as much as I can to practice and use up my spare clay.  The first attempt to create something was this cat.  I used Christie Friesen‘s cat tutorial book to help me with the face (that’s the book in the background).  I had planned it as a gift before I went away (she left for a few weeks so I wanted to give it to her early) but I’m not happy with it.

The side of the gray clay cat shows a thin tail wrapping around the body and textred fur.  My friends’ cat is a stripped gray cat and I had planned to paint darker gray acrylic paint to make it more accurate.  I don’t like the body so I think I’ll keep this one unpainted and practice a few more times.  This one is made of FIMO clay but I have some other brands to test out and use up.  This next two weeks is going to be fun as I have fun with clay and experiment.  What is your favorite critter that you’ve made, of clay or any other media?

A Polymer Christmas

This year I decided to make a few of my Christmas gifts and tried to decide what to make.  I finally decided to make my brother the Serenity, the ship from the movie Serenity and the TV show Firefly, and his wife two minions from the Dispicable Me franchise.  I made the minions first.

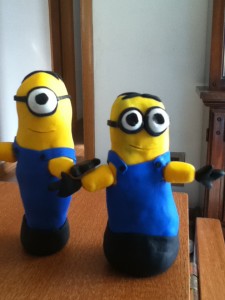
A slightly taller one-eyed yellow minion in blue coveralls and a slightly smaller two-eyed yellow minion in blue coveralls.

The two minions I made my sister-in-law for Christmas 2014

I debated making them with legs to be more accurate but I didn’t trust my skills to make the minions able to stand by themselves.  I debated making them sitting but finally decided to do the easy way and just give them solid bases.  I started out by getting a piece of aluminum foil and crumpled it tightly into a long snake before bending it in half and crumbling it into the correct shape.  Then I wrapped it in athletic tape and tied a piece of wire around its stomach so I could connect the arms later.  Then I covered the piece with yellow, blue, and black Fimo clay, added the details, and baked them.   I enjoyed making these guys and glazed the eyes to create the illusion of glass in their goggles.

The next day I started and finished the Serenity space ship and added a leaf under it.

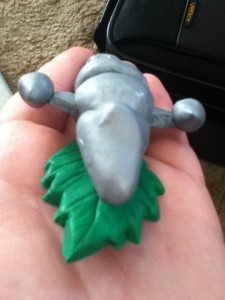
A silver polymer clay spaceship on a green clay leaf.

My Christmas gift to my brother: Serenity.

I had a day to make this so I used a mold to make the green leaf and cut some wire to go from nose to tail.  I wrapped some more wire around the long wire to keep the wings on and got out my black Fimo clay.  I shaped the black clay into the individual shapes I wanted (I had more black clay than the silver clay ) then covered them with metallic silver clay before baking both the leaf and the Firefly class spaceship called Serenity.  I had hoped to create the effect of multiple metal plates creating the skin of the ship but I ran out of time and it would have been VERY hard to create all the colors, pieces, and parts to make it look like the ship of the Firefly series DVD box set so I left it the basic ship.

Both my creations were well received and I enjoyed making them.  I may have to do more polymer creations!  🙂

Faerie Skin, Part One

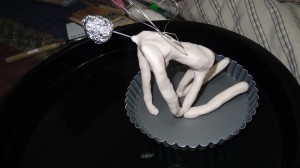
I started this step of my polymer clay faerie project with the armature done.  The next step pf the project was to cover the foil and wire with previously conditioned and mixed flesh-tone clay.  A human female figure kneeling with skin-colored clay from the neck down and wings coming from her back.  Her neck is a piece of wire and her head is a ball of aluminum foil.I got the flesh colored skin on the armature from the neck down before I had to stop the project for a while.  My next step will be to create the head and face or to create the detail of the skin such as the hands and feet and elbows.  Once both of those are done I’ll be able to bake the figure and create her dress and jewelry before I start working on the rest of the scene.  I have her on the small pie tray because it will be what I bake her on in my small oven.  Since she is now mostly covered in clay, it will be easier to leave her on one surface to work with than to keep moving her around, possibly smudging details as I go.

Putting Armature On My Faerie

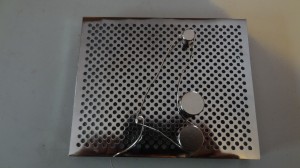
Last night I started with the wire frame of my faerie finished and my polymer clay for the skin conditioned.A pieces of wire wrapped around a metal jig to form the outline of a wing  The next part of the project was to create the wings.  I could have put the armature on before doing the wings but I planned to make the armature out of aluminum foil.  Wrapping the wing wires around loose aluminum didn’t sound too easy so I created the wire frames for the wings before adding the aluminum foil.  I created my wings on a Wig Jig out of 20 gauge wire.  I wrapped the wire around the first peg a few times to hold it in place and get some extra wire on that side.  I wrapped the end piece around the first peg once and left a long piece hanging before I cut the wire.  The I took the wire off the jig and unraveled the starting piece as well as the ending piece, then put my pliers where the first peg would have been on each side and twisted the two ends together a few times.  That way the two ends stayed together, there are long enough pieces to attach the wings to the skeleton, and the wings will stand out some from the skeleton so the wings will look like they are coming from her back, not her spine.

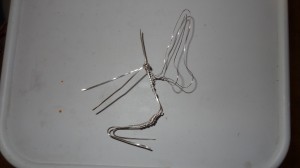
The silver wire skeleton of the faerie now complete with wings laying on a white surface.The next step was to add the two wing parts to the skeleton.  First I took the long ends on each piece and twisted them together twice.  That way they would stay together if bent instead of leaving dents in the clay if the wings were attached straight to the spine and not each other.  Finally I wrapped each wire to the body a little below the shoulders.  It may look more majestic to have the huge wings coming from between the shoulder blades but I have a small oven so I thought it best to have the wings end not too much higher than the head.  I attached two strands of the wire (one from each wing) to the spine above the wings and the other ends I twisted around the spine below the wings.  Hopefully if the wings are evenly anchored, they won’t droop or bend up but stand straight like real wings might.

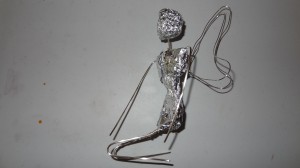
The last part of the project for today was adding the aluminum foil to create what I had called the armature.  I did some research and found out that the armature in art is the skeleton.  Things like wire or paper is used in professional art in order to stabilize the sculpture while being created and is often removed before curing since they would burn in a kiln.  In polymer clay, the oven that pieces get cured in does not get hot enough to explode the metal wire or melt aluminum foil so the armature usually stays in when cured and after.  Many polymer clay artists add aluminum foil to their skeletons to add stability and reduce the amount of clay used, which reduces the weight of the finished project.A wire skeleton, with wings, wrapped from waist to shoulders in aluminum foil with a foil ball for a head.

I added the aluminum foil to my wire skeleton in layers, one piece wrapping around the top of the wing pieces and another wrapping underneath the wing pieces to create the waist and hips.  I then rolled a ball of foil for the head and stuck it in place.  The next step will be to cover the armature with flesh colored clay and create the face.

Starting My Faerie

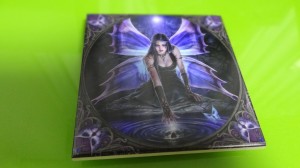
A white faerie in black clothes with clear dark blue wings and long black hair reaches for a skull in a rippling pond.

Immortal Flight by Anne Stokes

Wow, it has been so long since I added anything here.  In my defense, I moved in May and, um, procrastinated the rest of the time.  I’m finally settled for the summer (I go to college in the fall so I’ll move at least once this year and I’ll travel some more this summer).  Last weekend I went to the Bead and Button Show in Milwaukee, Wisconsin and decided it was time to start a project I had put off, a faerie based off an art tile I had picked up by Anne Stokes.

I plan to reproduce much of this image in polymer clay with a wire armature.   Below are some of the colors I will use to make the sculpture.
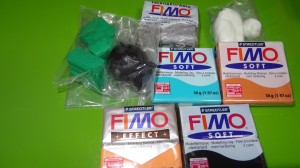
A few different colors of FIMO polymer clay, most of them still in their wrapping

Since that picture I have picked up a few skin tone squares to make her very pale skin and I’m still deciding how I will do her eyes, which are half closed in the tile.  In case you’re wondering why I am writing “faerie” instead of “fairy”, it is intentional.  When I think of “fairy” I think of the cutsy, small Tinkerbell version of fairies that children are taught of but “faeries” are the newer, more adult version of nearly human creatures, often with some sort of wing, that are not so bright, pure, and innocent.  Faeries have lived a long time and seen Mother Nature angry, sad, and happy.  They live beside dragons, elves, dwarfs, trolls, witches, werewolves, and ancient gods like Hera and demigods like Perseus.  These creatures protect the planet and forests, helping grow crops and sometimes helping Mother Nature in her devastation.   Faeries are not light and innocent, but many shades of gray and darker colors, in this case dark blues and purples.  I want to be able to sculpt these creatures, and all that inhabit the world of myth, in a way to show the beauty of that world.  However, I’m not that good at drawing or seeing the creatures in my head yet so I will use this tile as my guide to practice on and see what all will go into one figure and the scene around it.  If needed I have two other art tiles of Anne Stokes to recreate.

First things first though.  Now I have all the clay I think I’ll need, my oven nearby for when I finish, and a few decorations for the final scene.  Time to start the creating process.  Looking at the faerie, I assume she is sitting on her feet under her dress as she reaches for the skull.  That tells me that her legs and feet will be under skirt and aren’t as important as the rest of the skin will be.  With that in mind, I make the wire frame for the armature:A few pieces of wire bent to resemble a line drawing of a person sitting on their feet
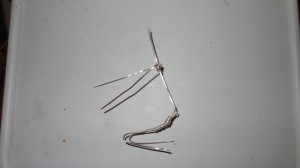
I realize it doesn’t look like a lot at this point.  I’ve been told the legs should be longer and the wire for the neck is probably too long but the head wire can be cut and extra clay can be added to make the legs longer.  At least it looks like a human.  My next step is to add wings and aluminum foil to complete the armature so I can put clay on it.  (Don’t worry, I’ll explain the armature next time when I complete mine.)

So for now: Have a nice day and enjoy crafting!
 

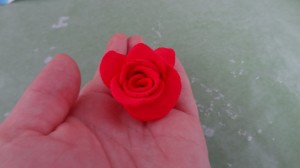
My Rose

The clay rose easily fit in my hand since it was smaller than my middle finger

A rose in hand…

A red clay rose close up tp show the individual petals
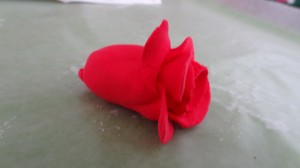
The rose from the side

I needed something more to practice on today and I noticed my origami flowers not far away.  Why not practice on a flower?  I remembered seeing a clay rose, although I don’t remember where I saw it, and decided to try it out.  A crepe paper flower is made by creating individual petals and usig tape to wrap them around the stem.  Using that theory I made a number of small petals that looked roughly the same size.  When I thought I had enough, I started wrapping them around each other.  I wound up with a rose that was deformed where it should have touched the stem.  There was just too much clay back there to look proper.  I looked at it sadly for a few minutes trying to figure out what I’d done wrong and how I should adjust for the next one.  Then I realized something.  I was working in clay.  If something doesn’t look right it doesn’t have to be destroyed to be fixed.  I picked up the red clay rose in my hand and pinched off the back end of the rose.  With less length and a slight rounding of the back, I got a rather nice looking practice rose.  I want to figure out how to create therose correctly the first time, but I think my first attempt at making a clay rose turned out pretty well.

A close up of a clay rose from the front.

The rose up close

My Second Clay Dragon

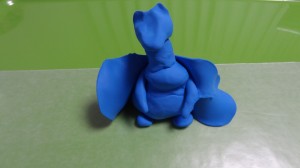
A blue clay dragon resting on its hind legs with thin wings but little detail

My second clay dragon

My second attempt at a clay dragon figure was made out of regular children’s clay.  I like working with the children’s clay as it is a soft clay, cheap, and comes in bold colors.  I can sit infront of my tv and not worry about getting clay everywhere or the clay drying out like may modeling clays start to do before the end of an episode.  I see it as a good time to relax and let my hands wander.  They can practice getting used to the feel of clay while my mind gets used to seeing how an image in my head gets put on clay.  I’m still working on the process but I got the basic design of the dragon body, head, and wings as well as the arms and legs.  I just need to figure out how to decorate and texturize my dragon and I may have a permanent dragon figure done by the new year.  That would be awesome…

If you want to see my first dragon, look a few posts back.  That’s all for tonight, happy crafting!

Clay Dragon

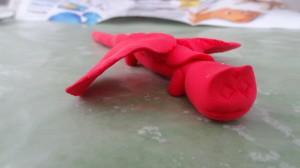
A small red clay dragon with diamond eyes, short stubby legs, and a long straight tail.

My first dragon

I recently got back to my clay and a polymer clay magazine which gave me a lot of ideas.  However, I don’t yet have an oven for polymer clay so while I wait, I get to practice with basic children’s clay which I picked up at our local toy store.  This is my first attempt at creating a dragon.  From tail to head is about long enough to fit on my hand from wrist to the tip of my middle finger.  I think I got the basics down for such a small dragon, although I admit I still have a long way to go before it looks like more than child’s play.  I enjoyed my first attempt at a dragon, figuring out how to manage the clay and how it will work to create the image I had in mind.  Step by step I’ll get comfortable with clay and learn how to get the image in my head onto the clay in my hand.  Once I’m comfortable with children’s clay, which is designed to stay moist and workable much longer than most modeling clays, I’ll start working on more permanent items or sculptures.  Eventually I want to work my way up to beads and sculptures in polymer clay that I bake.  However, that will take time and practice so I think I’ll just go back to my clay…