Saturday, August 4th, 2012 at 7:43 am
My Easter Lilies
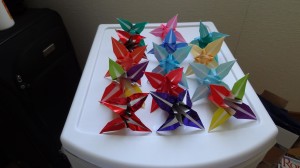
I finally finished those origami flowers I started Easter weekend. Remember that post I wrote saying that I wanted to brighten up my house with flowers for spring and than only got a few done by Monday? I partially folded precut origami paper into a number of origami lilies and then they sat in a box next to my bed for months. This week I finally decided to finish them all and make a few more. It’s interesting to me that once I got a few lilies done I started to feel comfortable with them and decided to make a few more than my original stash of partially finished flowers. I would definitely not call myself an expert on the folding (many of my creations still come up uneven or oddly twisted like the red flower in front) but I would say I’m ready for my next origami figure.
I think that my favorite flower is the shimmery blue one. It was made of stiffer paper so it was easier to fold. I figured that thicker paper would be harder to fold but it kept its shape well whereas the usual thin paper had no problem refolding to adjust to newer folds which would screw up the final product.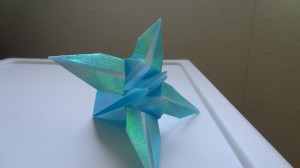
Friday, July 27th, 2012 at 1:50 am
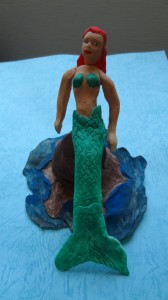 Yep, it’s taken a while but I finally finished my clay mermaid sculpture. She’s made of a white Japanese clay called Hearty which was a not hard to use but it dried out quickly so I had trouble forming shapes. If I spent too much time on a part, it would start to crack and I would need to knead it again, rolling it around in my hands, changing its shape until it was soft enough to work on. It worked out okay, although the stone is a little cracked and the wires holding the arms on and keeping the mermaid on the rock are rather obvious.
I used a mold by Sculpey, which I bought in the States last Christmas, for the arms, torso, and head while the fin I created by adjusting the length of the legs in the mold to what fins may need to be for comfortable movement at sea. Unfortunately the fin is connected to the body merely by the wire I used as a spine that connects from the head to the stone she sits on. I created the detail in the fin by a set of sculpting tools I picked up locally and realized this type of clay does not like to be but after it hardens but there probably wasn’t enough time to cut it while it dried. The scalpel rarely cut a straight line and the clay didn’t seperate, it came off in clumps, similar to when you try to cut a long sheet of paper. When I cut wrapping paper, I usually try to run the scissors up the side of the roll. If I actually cut with the scissors, the paper usually cuts straight. If I just hold the paper in one hand and slide the scissors up, the paper starts to rip and clump up on the blades o the scissors. That is how this clay cuts once dry.
It was also my first time painting with acrylic paint. It is not as easy as it looks by artists who make gorgeous paintings with acrylic paint. I had to keep the brush wet in order to paint since the paint itself dried up quickly. The effect of the lighter paint on the darker paint had potential but it will take time to master it and figure out just the right amount of water for what effect I want.
All in all, I think that the mermaid, whose rock base is a little bigger than my hand and the doll herself extends a little bit down my wrist from the tips of my fingers, turned out okay. I’m definitely not a master of this clay nor of acrylic paint but she turned out okay for how little skill I have. Practice will get me where I want to be and trying new materials will help my skill as well. Now for my next project…
Sunday, April 22nd, 2012 at 3:54 am

Willie Wonka Set by Dare To Dream Theater group
Many of you have probably sat at a theater and watched a play at sometime in your life. You’ve seen the curtain go up and watched the new world behind the curtain take shape. The characters on the stage are dressed perfectly as if they were in the world the stage decorations put them in. The props and flats (the large backdrops that set the scene in a barn or a field or a ballroom) all work together to create the illusion that the play is occurring somewhere other than on a stage in a theater in front of tens or thousands of people. Have you ever wondered what goes into creating a play and all the props and flats and costumes and makeup? Everything works together so well that most people don’t realize it takes months to put together a convincing setting for a good play.
My sister has been in theater since high school. Although she loved to act, and still does when she gets the chance, Rachel fell in love with doing the behind-the-scenes things as well. By the time she left high school to pursue theater in college, she had redone the makeup area in the school and raised the expectations of the drama teacher a lot. In college she had wanted to act in plays but the director usually cast her as assistant director or some other important position backstage. The director was trying to groom Rachel to get hired by the college as her assistant director. Not surprisingly, Rachel never tried for that position, instead following her dream of acting in community theater. It wasn’t long before Rachel found another dream of teaching children to love theater as much as she does. It started out as a two week class that ended in a small play and grew into the Dare To Dream organization which teaches theater classes to children and sets up performances for children with some adult parts played by adults so parents can be in plays with their children if they want.
On of the fascinating things about having a father who worked backstage in a popular professional theater years ago and a sister who directs children’s theater as well as acting when she can has been learning about the crafts that go into creating a play. Creating costumes can take a month or two before they are all prepared by volunteers, the backdrops get created by hobby carpenters before they get painted, the makeup is practiced a few times before the day of the show (the children do most of their own makeup with the help of their parents and the older children in the cast and crew), and props are searched for months ahead of time. It’s amazing listening to all the work that goes on behind the curtain and helping with it every once in a while.
Next time you sit down to watch a play, whether it’s your child’s grade school play or a professional play on Broadway, keep in mind how much work and how many crafts go into your hour or two of enjoyment.
Thursday, April 19th, 2012 at 5:48 am
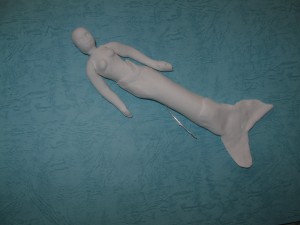 A few months ago I decided to buy some clay in a local craft store to see how it felt and to practice for more expensive polymer clay, which was the original goal for my clay works. I thought that creating cay beads with polymer clay would be a good way to make pendants when I can’t find any I like.
Like the origami paper and books I stared at for a few months, my clay has just been sitting on my shelf taunting me so I finally decided to make something. But what to make? Earlier that day I had picked up a magazine for modern mermaids (interesting life choice but awesome pictures) and decided a mermaid would be a pretty thing to test out my clay on. I had picked up a mold for a clay doll from Micheal’s Craft Store while I was home for Christmas this past season. I used that to create the head, torso, and arms as well as a size indicator for the fin. Before the clay dried I inserted a long wire to work as a spine and hold her up when I set her up to sun herself on a clay stone in the middle a clay ocean. Once I have the parts together, I’ll take the sculpting knives and add detail before painting the whole sculpture and posting it for the world to see. Unfortunately that won’t be any time in the near future as my work has me away from my sculpting tools for a while. However, I wanted to show you my first attempt at sculpting and see what you thought.
Monday, April 16th, 2012 at 11:38 pm
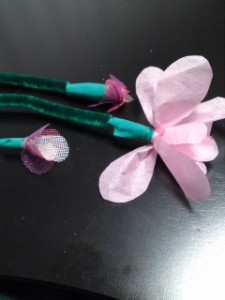 I had great hopes for my Easter weekend. I had hoped to make a lot of origami flowers and have my place look nice and spring-like. Instead I watched a few movies and tried to figure out the origami lily since my internet was down. I got a number of flowers halfway done but couldn’t finish the rest of the flower. Then I turned to a set I picked up to make roses our of mesh paper. The first “rose” I made, the top one, had petals too short to look remotely like a flower, the second one I made, the bottom flower, turned out better but not as good as I hoped. By then I had realized the pattern I had for the mesh flower was similar to a pattern I’d used years before to make crepe paper flowers for Easter as a kid and I made the big flower in the middle. By then I had gotten annoyed at my idea and stopped working on flowers to enjoy the rest of my Easter Sunday and be ready for work the next day.
Friday, March 30th, 2012 at 2:58 am
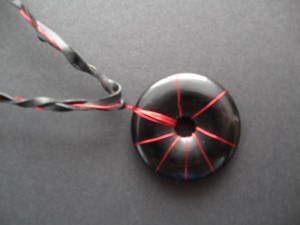 Gabe is another character my sister created for her story, which I talked about in my last post on Serianna. As my sister put it, “he is the “conflicted Conquerer”…he is strong and stubborn and determined.” He was raised to be an evil king but likes a lot of people who are good. He winds up falling in love with one of the characters but has to walk away in order to save his love from the darkness inside his family. A teenager torn between wanting to please his family and wanting to please the girl he likes is definitely conflicted.
Gabe’s element is fire and my sister wanted a volcanic stone with “golden red accents” so I found this obsidian donut stone and metallic red wire. It’s dangling on a braid of black kangaroo cord and red metallic wire.
Saturday, March 10th, 2012 at 10:22 pm
 As much as I love doing various crafts and learning new techniques, my main passion is playing with wire and stone to create lovely pieces of jewelry.
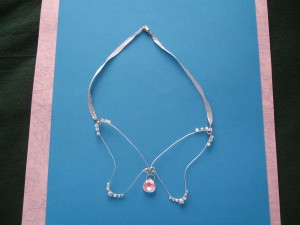
A while ago my sister asked that I create a few necklaces for her. She has been writing a teen fiction story about a group of high school students on a quest and was hoping I could create necklaces based on the character’s personalities to help her visualize them as she wrote the story. Creating necklaces about fictional characters someone else created in an unfinished novel was more difficult that I’d thought and it took a long time to get them done. However, I finally got the first necklaces done to depict Serianna, a strong yet child-like personality that identifies with the air element (of the four original “elements).
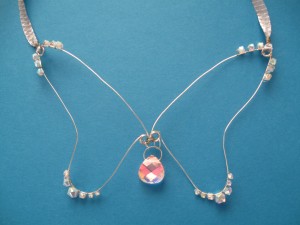
The necklace is a wire outline of fairy wings connected by thin wire. Swarovksi clear crystals decorate the tips of the wings and a crystal raindrop dangles below the wings where the body would be. The wings are suspended on light blue wire-ribbon connected by a magnetic clasp. Although I’m not a big fan of wearing sparkly crystals, I am starting to see how they can be used to create stunning jewelry others would love to wear. I think I’ll remember to include crystals more often in designs they suit such as the delicate wire of this design. The crystals add sparkle to an otherwise plain wire pendant and I like that addition. What do you think?